Image Editor
Gahela Commerce has a built in, browser based, image editor using modern HTML5 to streamline your image management. It is available in the WYSIWYG editor by highlighting an image and then clicking on the icon. It is also available to edit product images in the Products -> Edit -> Images section, and in various other sections of your website where images are used. Pixel Perfect Image Editor is a quick, simple, yet powerful way to edit all the images on your site.
Tools available:
- Optimized Image
- Crop
- Watermark
- Flood Fill / Background Eraser
- Resize
- Rotate/Flip
- Brightness/Contrast
- Sharpen
- Red Eye Removal
- Change Color / Colorize
- Borders
- Text
- Grayscale, invert, posterize
- Overlays & banners
Interface
The image manager has an easy to use interface with four main areas.
- Tools
- Image Zoom and Size
- Undo/Redo
- Mouse Position and Hovered Color

Save Optimized Image
It is important for web images to have a high level of quality, without being too large. The image optimizing feature allows you to compress and optimize your image in real time. You will be able to see the quality and file size as you adjust the image to assure it looks just how you want it.

Type: An image can be saved as a PNG, JPG, or GIF. Generally, JPG is the most common format. However, sometimes a PNG image can display sharper with a slightly increased file size. You can toggle back and forth in the Save Optimizer display to find the best format for your image. Note: the more times you open and save a JPG image the more quality is lost permanently.
Matte: Select the background color if there are transparent areas on your image.
Quality: A slider from 1-100 to set the quality of an image. The lower the number the more an image is compressed, which results in a smaller filesize, but more compression artifacts. The larger the quality slider number, the higher the quality, and filesize of the resulting image.
Filesize: A real-time display of the resulting filesize of the image, based on the parameters
Filename: The filename of the image. This should not be changed in most cases, and sometimes is read only. If the filename is changed, please note this will not delete the existing file, which could result in a large number of images in your file system.
Zoom
With the zoom tools you can zoom out of large images to see the entire image on your screen, or zoom into an area of an image to make a precise crop or edit.

Crop
With the Crop tool you can select an area of the image and discard everything outside this area. Cropping reduces the dimensions of an image, but it is not the same as resizing. Cropping does not alter the size of the image content at all.

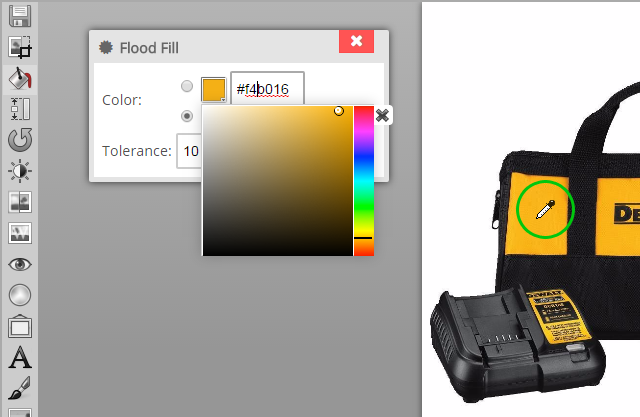
Flood Fill / Background Eraser
Resize
Resizing an image reduces or enlarges the entire image and everything in it. It is highly recommended not to increase an image size, as this always will result in a lower quality result.

Preserve Ratio: When this box is checked the original aspect ratio of the image will remain intact when you resize it. For example, if your image width is 2000 and height is 1500, changing the width to 1000 will change the height to 750. Likewise changing the height to 750 will change the width to 1000. Generally, you will not want to change the width or height of an image without changing the corresponding height or width, because this will cause distortion of the image.
Resize Canvas Only: This option doesn't change any proportions of the image, but changes the size. For example, if you have a 200x200 image and change it to 250x250 with the Resize Canvas Only box checked the resulting 250x250 image will have 25px of space on each side, surrounding the existing image.
Rotate / Flip
An image can be rotated in any direction, by any number of degrees. First, select the direction left or right, and then either select the options 90ð, 180ð or 270ð, or use the Free rotate option to enter any value. The option Flip horizontal before rotating, will first flip the image before rotating it. If you need to flip the image without rotating, enter 0ð in the Free input.

Brightness/Contrast
The Brightness/Contrast adjustment lets you make adjustments to the tonal range of an image. Moving the brightness slider to the right increases tonal values and expands image highlights, to the left decreases values and expands shadows. The contrast slider expands or shrinks the overall range of tonal values in the image.

Sharpen
The sharpen tool has two modes:
- One Click Sharpen (basic)
- Unsharp Mask (advanced)
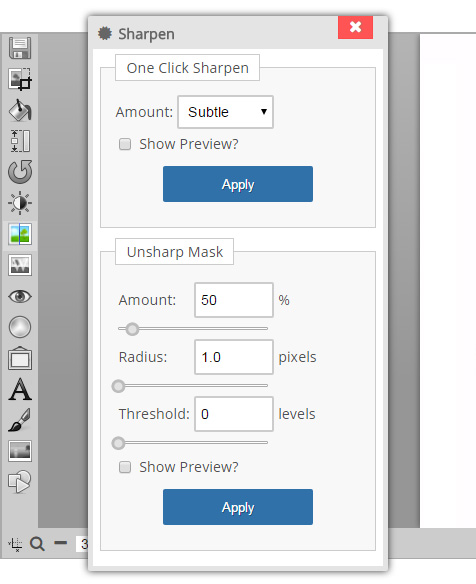
One click sharpen: makes it easy to quickly sharpen an image by selecting one of three options Subtle, Moderate, or Strong. The one click sharpen works by examining each pixel in the image and comparing it to it's neighboring pixel. The differences in the pixels are then enhanced which creates a sharper image. On some low resolution images, or JPG images with a lot of compression artifacts, there may be some unwanted edge effects.
Unsharp mask. Digital unsharp masking is a flexible and powerful way to increase sharpness, however, it is easy to create unwanted and conspicuous edge effects, or increase image noise.
Three settings control digital unsharp masking:
- Amount is listed as a percentage, and controls the magnitude of each overshoot (how much darker and how much lighter the edge borders become). This can also be thought of as how much contrast is added at the edges. It does not affect the width of the edge rims.
- Radius effects the size of the edges to be enhanced, or how wide the edge rims become, so a smaller radius enhances smaller-scale detail. Higher Radius values can cause halos at the edges, a detectable faint light rim around objects. Fine detail needs a smaller Radius. Radius and Amount interact; reducing one allows more of the other.
- Threshold controls the minimum brightness change that will be sharpened or how far apart adjacent tonal values have to be before the filter does anything. This lack of action is important to prevent smooth areas from becoming speckled. The threshold setting can be used to sharpen more-pronounced edges, while leaving subtler edges untouched. Low values should sharpen more because fewer areas are excluded. Higher threshold values exclude areas of lower contrast.
Generally a radius of 0.5 to 2 pixels and an amount of 50% is a good start. http://en.wikipedia.org/wiki/Unsharp_masking
Watermark
The watermark tool lets you apply a semi-transparent image on top of your image to protect it from digital theft. A watermark can be used to identify your business as the owner of the image.

Parameters:
- Image: The image parameter lets you select the image to display as the watermark. You can also upload a custom image by clicking the upload button. Any image uploaded will be available on all products. A watermark image needs to be a 24+ bit PNG file with transparency.
- Position: The watermark can be placed at the Top, Bottom, Center, or you can enter custom X/Y values to place the watermark at any point on the image
- Rotation: Rotate the watermark in any direction from -360 to 360ð
- Pattern: The watermark image can be repeated or stretched to fill the entire image
- Opacity: The opacity slider controls how much of the background image shows through the watermark. The higher the number the darker and more defined the watermark is displayed.
- Scale: The watermark can be scaled smaller or larger to fit better on the image. Sliding the scale to below 100% will shrink the watermark, and a value above 100% will increase the watermark size.
Colorize
The colorize tool lets you re-color an image. For example, if you have a blue t-shirt and you need to show a picture of a red t-shirt you can change the color of the image and use it for the different option. The example below shows a red shirt (original color on the left) that was color changed to green.

The four blending methods are:
- Hue: Keeps the hue color while blending the luminance and saturation of the image. Hue is the color. When you describe a color as red, yellow, green, or blue, you are describing the hue.
- Saturation: Keeps the saturation of the color and blends the luminosity and hue from the image. Saturation is the intensity of a color, in terms of pale or weak.
- Color: Blends the hue and saturation of the color with the luminance of the image.
- Luminosity: Keeps the luminance of color and blends it with the hue and saturation of the image. The luminosity is the brightness (or "lightness") of a color.
Borders
The border tool adds solid colored borders to your images. The optional parameters are:

- Color: The border color
- Width: The pixel width of the borders
- Corners: The style of the corners. The options are Miter, Round, Or Bevel. In the example to the left, the top is a miter join, the middle is a bevel join, and the bottom is a round join.
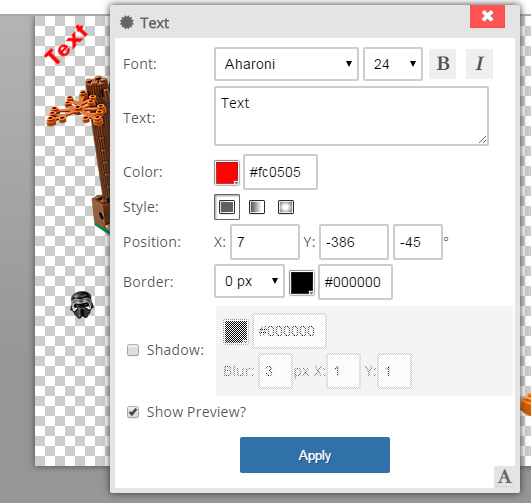
Text
Add text to your image. The parameters are:
- Font: Select the font to apply, font size, and Bold or Italics.
- Color: Select the main color of a font.
- Style: There are three style options: Solid, Linear Gradient, Radial Gradient. When selecting one of the gradient options, a color 2 will be displayed to set the 2nd color of the gradient.
- Position: Set the X/Y position of the font and the angle it will be displayed. Tip: You can use your mouse to move the text on the image.
- Border: Select the border (if any) and border color to be displayed around the text.
- Shadow: Set a shadow color, blur, and the direction it will be displayed behind the text.
- Text: Enter the text to display on the image.
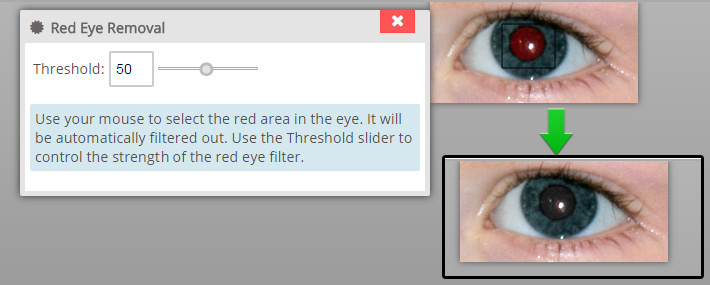
Red Eye Removal
Adjustments: Grayscale, invert, posterize
Select an adjustment to apply to your image:
Greyscale: This will remove all colors from your image. In black and white mode you can reduce your image to a single number of black and white values.
Invert: This will invert the colors of your image White will become black, red will become green, etc.
Posterize: This reduces the number of colors in your image, creating a unique effect

Overlays & Banners
The Overlays tool lets you add banners, overlays, and other special effects to your image. This is great for promotions, new products, or just to create a more interesting image to grab a customer's attention.

The parameters are:
- Image: The image parameter lets you select the image to display as the overlay.
- Color: The color of the overlay. This colorization works on the hue of the image. Selecting the Greyscale option will convert the overlay to a black and white image.
- Position X, Y, degrees. You can use your mouse to move the overlay on the image, or you can enter custom values in the fields. Selecting the flip horizontal option will display the overlay flipped horizontally along its x axis.
- Opacity: The opacity slider determines how much of the image will be shown through the overlay. This is default 100, no opacity.
- Scale: The overlay can be scaled smaller or larger to fit better on the image. Sliding the scale to below 100% will shrink the overlay, and a value above 100% will increase the size.